Monday 27 February 2017

Spring Cleaning Your Dirty Make Up Brushes!

Such Pretty Brushes! #Repost #Follow ➡ @Xoxhollyb on Insta for more makeup posts :
Brush goals!
This month, we’re all about giving our lives a little Spring Clean. And what better way than deep cleaning our makeup brushes! You can spend all the money you want on skincare, but if your tools are dirty then there’s just no point!

Who actually cleans their brushes as much as they should? (Not me.) If you use brushes daily, you should wash them weekly - all your other brushes are fine to be washed at least every two weeks. (Obviously, if you do makeup on other people you have to clean them after every use.)


WHY SHOULD YOU WASH YOUR BRUSHES?
Do your brushes look like this?
YOUR SKIN: When you use your brushes, they will get full of oil, dirt and bacteria. They also pick up bacteria from lying around on the surfaces around your room! This gunk will touch your face every single time you use your brushes and cause clogged pores and serious break-outs.

YOUR EYES: Unclean brushes can cause eye infections, and dirty eyelash curlers built up with mascara can rip your eyelashes out.

YOUR APPLICATION: Using dirty brushes makes products look patchy, muddy and difficult to blend due to all the build-up in the brushes.

YOUR $$$: Washing your brushes makes them last longer, protecting your investment – meaning you don’t have to replace them so often!

YOUR MAKEUP: Unclean brushes can form a solid layer over powder products, due to the oils transferring from the brush. They also don’t pick up pigment properly, wasting loads of product!

You can tell your brushes are ready for a Spring Clean when they are visibly dirty, discoloured, and no longer soft. Also, if you're breaking out or your makeup isn’t applying how it should do – it may be time to give them a scrub!


PROFESSIONAL BRUSH CLEANER OR DIY?
You need to decide whether you want to invest in some good quality brush cleanser, or use a more natural, home-made version. They both work excellently so it’s really up to you. 

Here are our favourite store bought cleansers from Real Techniques, Estee Lauder, Clinique & MAC.


If you’d rather make a homemade solution, they work just as well! Make sure that you are using one part that really deep cleans the brushes and one part that conditions the bristles. Your average soap and shampoo will seriously dry out your brushes, so use the picture below to mix and match, and create a cleanser out of what you have at home!


- Don’t use anything massively perfumed as it can irritate the skin

- Steer clear from shampoo with a high amount of silicone, this coats the bristles and makes them pick up less product

- Make sure you deeply condition natural bristle brushes as they easily dry out


ON TO THE CLEANING!
1. Start running a tap with luke-warm water (not hot!)

2. Start with the dirtiest first (like brushes used for foundation or cream products), they need the most attention!

3. Wet only the bristles of the brush. Any further up, and liquid can loosen the glue and make the brush shed - as well as make them smell nasty! Water getting into a wooden handle can also make them swell, crack and rot.

4. Dip your brush in your solution and swirl the brush around your palm gently. For a real Spring Clean, use a specialised cleaning pad – Sigma and Real Techniques both do great ones!


5. Squeeze the water and product out the bristles gently with your fingers.

6. Repeat until the water runs clear.

7. Reshape the bristles with your hands, and lay them to dry on kitchen roll or a towel.

8. Rub the handles with alcohol – don’t forget there’s bacteria on there too!

9. Leave the brushes to dry completely for 6-8 hours. 

Ideally you want them hanging off the edge of a surface so the bristles dry evenly - but this can be tricky! You can buy a brush drying rack (like this one from Sigma), but if you don’t want to spend the $$$ just make sure you turn your brushes regularly to dry them evenly!


NEVER dry your brushes upright or back in their pots – this is another way water can get into the brushes making them fall apart!

Don’t forget beauty blenders, eyelash curlers and any mini brushes that come in kits! For sponges, simply roll the sponge around in your hands with your cleanser and keep squeezing until the water runs clear – this can take a while with sponges!


If youre not into spending a long period of time deep cleaning, there are some other ways you can get away with doing it less! 

-You can buy a machine that cleans and dries your brushes in ‘seconds’. I’ve never used one, though, and they can be expensive.

- SPOT CLEAN more! After use, use a cleansing spray to dampen your brush, then wipe all the product off with a paper towel. 

Spot cleaners from Bare Minerals, The Pro Hygiene Collection & NYX

- Invest in a few more brushes so you can rotate them, meaning you always have a clean brush and don’t have to deep clean weekly. My favourite set is this one from Morphe – it’s lasted me so long!


Finally, never be afraid to say good bye to a battered brush! Throw them away when they start shedding on your face, losing a lot of bristles or just aren’t keeping their shape!


How often do you clean your brushes? Will you be giving your tools a scrub this Spring Clean season? Let me know!


*This post is supported by Soap & Glory but as always all views & opinions are my own*


signature photo 3662725_zpsi6q2ahff.png

Thursday 23 February 2017

Syn Free Slimming World Sweet Potato Nachos!


The one thing I hate about being healthy is not being able to eat all the awful junk food I love so so so much. When I joined SW I knew I had to figure out an alternative for fatty Mexican food, in particular, NACHOS

I got to work trying loads of different variations - and I absolutely LOVE these nachos! They use your healthy extra A choice of cheese, so they are completely syn free! If you want to, add the guacamole (like I have) for just 3.5 syns! 


Homemade salsa and guacamole are always better than the shop bought stuff, but if you really can't swap your sour cream for yogurt, you can use the reduced fat version. Just remember to syn it for 1 syn per table spoon!


To make the meal more time-efficient, you can make batches of the salsa and guacamole, and precut the sweet potato. Then it literally takes minutes to make!

I hope you enjoy the recipe, and please send me or tag me in your pictures if you do make it! :) 


Syn Free Slimming World Sweet Potato Nachos!
Serves 1 person (easily multiplied!)

INGREDIENTS: 
- 1 large sweet potato or 2 small ones (or white potato if you prefer)
- 40g reduced fat cheddar cheese
- Small pot of fat-free greek yogurt (about 3 tbsp will do for one!) 
- Low-calorie cooking spray
- Salt and pepper 

For the salsa:
- 7 cherry tomatoes 
- 1/4 red chilli
- Juice of 1/4 lime
- Coriander  

For the guac (optional 3.5 syns):
- 4 cherry tomatoes 
- 1/4 red chilli
- 1/4 avocado 
- Juice of 1/4 lime 
- Coriander 

Other syn free toppings you can try!
- Jalapenos
- Black beans 
- Sweetcorn
- Spring onion
- Peppers
- Chicken, beef or pork


METHOD
1) Preheat the oven to 200 degrees.

2) Spray a baking tray with low-calorie cooking spray.

3) Cut the sweet potato into thin rings, and place on the baking tray.

4) Spray with the sweet potatoes with low-calorie cooking spray and season with salt and pepper. 

5) Bake for 15 minutes (or until tender), while you make the salsa and guacamole. 

6) For the salsa: Finely dice the cherry tomatoes and chilli, and mix with the lime juice. Add coriander to taste, and season with salt and pepper.

7) For the guacomole: Finely dice the cherry tomatoes and chilli, and mash up with the avocado and the lime juice. Add coriander to taste, and season with salt and pepper.


8) Once the sweet potato is baked, spread the salsa over the potatoes and sprinkle with cheese. This is the time to add any additional toppings like jalapenos! 

9) Bake for an additional 5 minutes, or until the cheese is fully melted. 

10) Plate up and serve dolloped with the guacamole and yoghurt. 

11) Enjoy!


Have you tried these nachos yet? What did you think? Or do you have a different favourite fakeaway? Let me know!


signature photo 3662725_zpsi6q2ahff.png

Tuesday 21 February 2017

How To Get Glowing Skin: Soap & Glory 'The Greatest Scrub Of All'


I am so particular about my skin care. If I ever stray from my regimented regime, then I can never get all my make up off and I break out so so badly. 

I'll always be a huge advocate of Clinique and all their products, I just think their skincare is insane! I was using their Exfoliating Scrub (until I left it behind in a hotel room) and I've been neglecting exfoliation ever since...


So when this Soap & Glory facial scrub turned up at my door I thought it was the perfect time to slot something new into my routine - and put it through its paces to see how it weighs up!


Firstly, I love the packaging! I feel like I say this about absolutely every S&G product but I really do! The pearlescent tube is so so pretty with the pink writing (and there's a reason for it!) When you squeeze the product out it is actually a glowy, iridescent creamy scrub, which really intrigued me.

You only need a really small, pea-sized amount to exfoliate your face... and I was really impressed! 


The scrub has a really subtle, fresh scent which I love - as I hate using strong fragrances on my skin. It's a very fine exfoliant, which I'm really not used to. All the facial scrubs I've used so far have been quite chunky and gritty, and satisfyingly rough. At the time it seemed like a good thing, but I am definitely someone who over-exfoliates. I find with chunkier, grittier scrubs that I'm more likely to cause redness in sensitive areas (like around my nose and across my cheeks). 

The fineness of the scrub makes it great for sensitive skin, and it's creaminess keeps it hydrating. The tiny beads within this scrub disintegrate as you work it into your face, so you don't have to worry about over doing it and scrubbing for too long. 


These 'popping' beads are also fabulous if you are conscious about the environment! Soap & Glory stopped using microbeads in all their products three years ago, so you won't have to worry about damaging any sea life!

There are two types of beads made up of silica and salicylic acid. The silica is what gives your skin the immediate glow after you use the scrub - it's amazing! It is also proven to even your complexion and improve skin cell renewal. Salicylic acid (which you've probably heard of) is a well-known fighter of acne and blemishes. It reduces pores and sebum production, as well as being an anti-inflammatory.


This scrub is only £9. which I think is so affordable for skincare! You can pick it up here, or in any Boots store! 


Overall, I'm so pleased with this scrub. I really didn't think I was going to like it, but now it is going to be one of my shower staples! I love how hydrating and light the exfoliant is, making it really gentle on my skin.

Have you tried this scrub? What did you think? Or do you have another scrub of choice? Let me know!


*This post was supported by Soap & Glory but as always all views & opinions are my own*


signature photo 3662725_zpsi6q2ahff.png

Wednesday 15 February 2017

9 Ways to Freshen Up Your Uni Room For Spring

Moving out and having your own house is obviously an amazing part of university, where you get to be independent and live how you want! But if you're anything like me then you will miss the comforts of your clean, warm room at home. When I was having a hard time at uni, I found so much comfort in making my room as nice as possible!

Now we're leaving winter behind, here at Soap & Glory we are all about Spring Cleaning, detoxing and getting stuff done! Here I've written 9 ways that you can freshen up your uni room and give it a new lease of life! 


1. A THEME
Scandi Bedroom in grey, gold and pink with lots of texture:
This Scandi themed room by Lust Living is so gorgeous! 

If you want your room to feel really homely then you need to have some kind of colour scheme or theme to follow. My room has always been purple for as long as I can remember, and it meant I could bring all my things from home to uni and not buy as much! If you don't want to commit to a certain colour then you can decorate within a theme you love like Scandi, mixed metals... There's so much you can do!


2. PHOTOS & PRINTS
Tom Ford Print (£4.49, Desenio) Chanel Print (£4.94, Peach and Gold) Sparkle Print (£5.44, Print Shop Studio)

I feel like almost every student has loads of pictures all over their walls! It really does make me happy, though, to look up at all the pictures of my faves and how much fun we have! It gives you something to look forward to - going home to your family and friends in the holidays. If photos aren't your thing, then pinning up prints is a really cool idea. You can get them at most stationary shops, and places like Etsy do some really unique ones!


3. BEDDING
H&M Sheets: Pink Floral (£39.99), Grey Pattern (£17.99), Blue Patten (£34.99), Purple Feather (£19.99)

Your bed will probably be the biggest thing in your room, so if you get some nice bed linen then it will honestly make your room look 100x better. If you've read my H&M Home Wish List, you will see that I adore H&M bedding (and all their homeware). These sheets are my faves that they've got in at the moment, plus they are really cheap and good quality! 


4. LIGHTING
Lighting can really make your room so lovely and cosy! I know it's so cliche but fairy lights really do make your room feel warm and homely. They are so cheap too: on Amazon you can get a good set for under a tenner! You can also invest in a nice bedside lamp or a new lampshade. I have this 'glass' pendant shade from Wilkos, it's so so nice and I'm so glad I bought it. The ones you're given in student houses are never nice, and it really makes your room look much more put together. 


5. BUNTING OR TAPESTRIES
All tapestries are £31.20 from Society 6

Another cliche decorative item: bunting. Depending on the colour of your room there are millions of cheap bunting sets all over the internet! Mine is a super long lilac wedding bunting that was really inexpensive of Ebay. If you want a more subtle look you can get cream or lace bunting that is less 'in-your-face'. If bunting is just way too girly for you then you can always hang up a tapestry. Society6 do hundreds of tapestries that are really really cool.


6. STATIONARY
Tray (£10), Notebook (£10), Pen (£8), Sticky notes (£6.50), Stationary set (£10), Clipboard (£7), Pen pot (£5)

Buying nice stationary doesn't just make your room look lovely, it also keeps you organised and makes you motivated for studying! Paperchase do the best stationary ever, and their new Jardino collection is so so beautiful and perfect for Spring!


7. PLANTS 
Adding some greenery and life is the perfect way to switch up your bedroom for Spring! Not only do the flowers look so lovely, and make your room smell great - but you can also have fun with the vases too! I have been lusting over this Cactus Trio for months now - the mini plants are so cute and the concrete-copper pots are so cool.


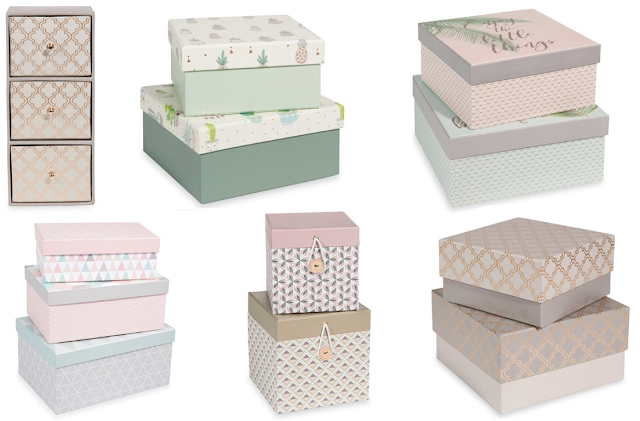
8. STORAGE BOXES
All boxes are from Maison Du Monde

Storage boxes are such a nice way to add colour and patterns into your room. Not just that, they are also so practical because you will never have enough space in a student room for all your stuff. Maison du Monde is one of the best places to buy decorative on-trend homeware, and it's so inexpensive. I love all these storage boxes - They really nail the Pastel x Metallic trend!


9. RUGS & CURTAINS
Soft furnishings are extremely optional when it comes to decorating your uni room. After all, you are only there for a short amount of time and you might not want to spend your money on things like rugs and curtains. However you can get some really cheap, good quality pieces, that really make your room cosier. I have this fur rug from Argos, and it is honestly so soft and warm - it makes my hard floor a little less plain. You can also get cheap curtains of Ebay or Amazon if you really want to go hard on your theme. 


Hopefully, this post might have given you some inspiration if you were looking to inject some life into your room this Spring! What are your top tips for decorating your university room?


This month we are rewarding girls who are getting into the 'Spring Clean' vibe - whether that be cleaning their room, a university closet or a street clean up! Let me know if you've got any girls who deserve a treat from us...


*This post is supported by Soap & Glory but as always all views and opinions are my own*


signature photo 3662725_zpsi6q2ahff.png

Saturday 11 February 2017

Soap & Glory Drama Clean & The Fab Pore: REVIEW


Obviously, I am a huge Soap & Glory fan, and I have used a shed load of their products. However, I have never ever ventured into their skincare! I am seriously picky and sceptical about skin care: my skin is temperamental and I have stuck to Clinique’s 3 Step Skincare program for years and years.


I feel like I know skincare pretty well, and I definitely know my own skin. So, when I got my hands on these two products, I knew I’d be coming from a good place to give a really thorough review. The products I’ll be reviewing in this post are the Drama Clean 5-in-1 Micellar Cleansing Water and The Fab Pore Purifying Foam Cleanser. Together they would normally be £14, but Boots are having an offer on S&G at them moment - so they are £5 each! 

I’ll be breaking them both down, and letting you know if they are a hit or a miss...


DRAMA CLEAN 5-IN-1 MICELLAR
CLEANSING WATER (RRP £6)


Firstly, I adore the bottle. It’s honestly such a gorgeous pink ombre bottle, I even instagrammed it! I also love the smell – it’s really light and fresh. You can see above all the lovely things this product is made of, and it really does smell so natural and subtle. 


You use this just as you would any other micellar water, by sweeping it all over your face with a cotton pad. The product brags the line ‘no rubbing required’ and I would completely agree with that! You really only need to wipe your face very gently, and it removes a multitude of sins! I was shocked at how it removed so much more than any face wipe, it really does get every scrap! You can feel it removing your dead skin cells as well as all your makeup, while still leaving your skin smooth and soft. I didn’t find this water left my skin dry and sticky, as a lot of makeup removers do, so I really loved that.

Unfortunately, I have sensitive eyes, and I have always had to remove my eye makeup before I clean my skin – and this was no different. I couldn’t take all my eye makeup off as it did sting my eyes a bit. So, if you have irritable eyes like me, then just use this on your skin and it will work a treat.  

This cleanser comes in at £6 normally, which admittedly is a bit more than your average drug store micellar water (it's on offer at Boots atm for £5!). However, this is by far the best one I’ve used, it is almost disgusting when you see how much it removes. It's great for all skin types, and I think the bottle and the scent make it worth it!


THE FAB PORE PURIFYING FOAM
CLEANSER (RRP £8)


This soft, foamy cleanser is created with oily to combination skin in mind. It contains bisabolol, which is an ancient ingredient used for soothing, healing and reducing redness. You can smell the witch hazel in this cleanser, a traditional skincare component popular for toning the skin and tightening pores. However, witch hazel can sometimes be too harsh on delicate skin, so be careful if your skin is especially sensitive.

This cleanser is not like your usual foaming cleanser. I have used loads before, and I've always felt they left my skin tacky and really dry. This foam is a lot thicker and velvety! The foam is really soft and lathers up into a really creamy mousse - I was really pleasantly surprised! The wash is really cooling and minty on your face, perfect for waking you up in the morning and prepping your skin for the day! This cleanser is normally £8 (£5 atm), which I personally think is amazing for a cleanser! 


All in all, I think these two products are great! The cleanser does state is aimed for the more oily skin types but the foam is so creamy and hydrating, so I think both will be brilliant for all skin types! This is a fab, affordable duo to prep your face for the day and thoroughly cleanse it at night. As I said, S&G is having a sale at the moment and loads of stuff is £5, including both these items, so get your hands on them while you can to save some $$$!


Have you ever tried S&G skin care? What do you think?


signature photo 3662725_zpsi6q2ahff.png

Thursday 9 February 2017

Soap & Glory Sexy Mother Pucker Lip Glosses: REVIEW & SWATCHES


This is without a doubt the most well known Soap & Glory product ever created! Back with a new formula, I'm here to review the SMP Glosses we all loved as teens! 

The lip plumping technology used is explained as tiny microscopic sponges that are really dehydrated, and then expand when they meet the moisture on your lips! The tingly feeling you remember is the plant oils used, that increase circulation and make your lips look instantly fuller. The glosses come in seven pinky-nudes, all of which I am swatching and reviewing in this post...


Firstly, does it actually make your lips bigger? I put this claim to the test, and here is my before and after picture (using the shade Spun Sugar).


Tell me what you think? But I really can tell a difference. The lips on the bottom picture definitely look a lot plumper, and the gloss is gorgeous! 

The tingly feeling is not bad at all! I know some people find it odd, and obviously it's something to get used to - but it really is nothing too intense.


On to the shades: the seven shades are all very wearable variations on a nude gloss. Below is a picture of all the shades swatched on my arm:


And here are all the glosses on!


BARE ENOUGH


'Bare Enough' is a browny nude gloss with no shimmer. It is definitely a matte gloss! Below is me wearing the gloss over Mac's Velvet Teddy. This colour combined with the amazing plumping technology gives the perfect Kylie Jenner Lips!


CANDY QUEEN


'Candy Queen' is a lovely pinky nude shade, with really finely milled glitter running through it! Below is me wearing it with Mac's Angel - it's such a lovely day time nude!


DOUGHNUT


Doughnut is a completely shimmerless flesh-toned nude. Below is a picture of me wearing it over Topshop's Nevada - the iconic cult classic lipstick and one of Zoella's faves!


NUDE STAR


'Nude Star' is an insanely shimmery bronze gloss - I absolutely love it! It's so perfect for the summertime because it's so glittery and golden! Below is a picture of me wearing the gloss over NYX Matte Lip Cream in 'London'.


PINK OUT LOUD


'Pink Out Loud' is an almost duo-chrome glittery gloss. In the light it sheens between pink and purple and it's really gorgeous and unique! Below is a picture of me wearing the gloss over Mac's Creme Cup. 


PLUMS UP


'Plums Up' is the darkest gloss of them all. It's perfect for these winter months and it goes great over darker lipsticks. Below is a picture of me wearing it over Gerad Cosmetics Matte Liquid Lipstick in 'Everything Nice'.


SPUN SUGAR

'Spun Sugar' is the most subtle gloss of them all. It is a completely clear formula that's full of glitter! It looks great over any colour and can be used to hydrate matte lipsticks.


This gloss sells in Boots for £9, which is a pound or so more than your average drugstore gloss. BUT when you take into account that most lip plumping formulas will set you back at least £20 (some of which aren't even combined into a gorgeous wearable gloss), it is seriously a bargain! Check them out, and pick one up here!


Have you tried the new SMP formula? What do you think?


signature photo 3662725_zpsi6q2ahff.png